





Description
Dialogue
Crisp, branching Minecraft conversations with a visual browser Studio.
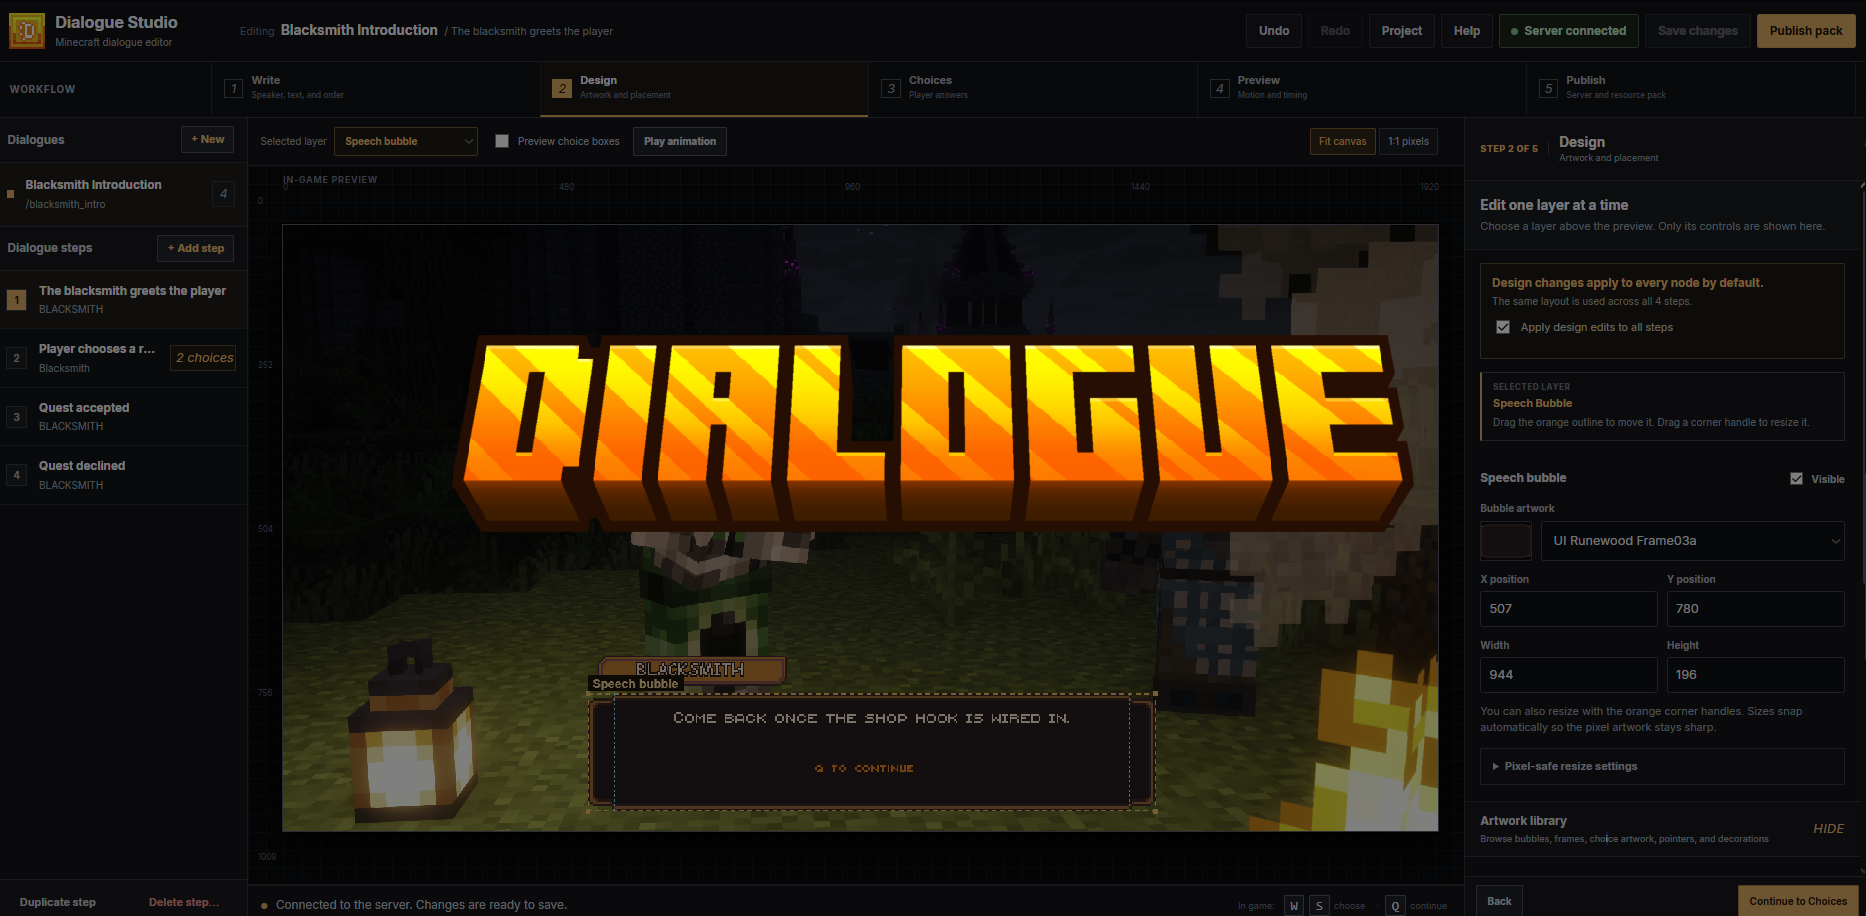
Dialogue is a self-hosted conversation plugin for Paper. Write the conversation, arrange the artwork, preview the complete animation, and publish it into an ItemsAdder or Nexo resource pack. In game, each player sees a private cinematic overlay that can run on its own or follow a camera controlled by Typewriter.
Current release: 1.2.3
What makes Dialogue different
| Area | Dialogue's approach |
|---|---|
| Visual quality | The Studio preview and published frames use the same 1920 × 1009 layout. Text and artwork are rendered before gameplay, so the result does not depend on Minecraft's live text rendering. |
| Pixel-art resizing | Bundled frames have reviewed resize rules. Borders, corners, connectors, and repeating sections stay crisp instead of being freely stretched. |
| In-game presentation | Opening, backdrop, typing, choices, and closing states are shown through one private overlay display per active player. |
| Brightness | Published models are full-bright, preventing world lighting from dimming the dialogue artwork. The original PNG colors are not altered. |
| Cinematic compatibility | Dialogue follows an existing Typewriter or cinematic camera without replacing or resetting it. With PacketEvents installed, standalone conversations use their own camera lock. |
| Server ownership | The Studio, projects, and custom artwork stay on your Minecraft server. No hosted editor account or external database is required. |
Dialogue is designed as the visual conversation layer of a server. Quest objectives, conditions, and rewards can stay in the quest plugin you already use, while Dialogue handles presentation, player choices, and command hand-offs.
Features
- Multiple conversations with branching dialogue steps
- W/S answer selection and Q to reveal, continue, or confirm
- A guided Write → Design → Choices → Preview → Publish workflow
- Complete browser preview of opening, dark backdrop, typing, choices, and closing animation
- Direct canvas dragging and corner resizing for individual layers
- Shared design across every step by default, with optional step-specific layouts
- Independent speech bubble, name frame, speaker, body text, choice, prompt, pointer, and decoration layers
- More than 500 bundled UI assets: speech bubbles, answer frames, name frames, pointers, and decorations
- 13 bundled pixel fonts with independent size, spacing, alignment, color, outline, and shadow controls
- Custom PNG upload for bubbles, name frames, answer frames, pointers, and decorations
- Lossless whole-pixel sizing for bundled and custom pixel artwork
- Optional commands when a conversation starts or ends, a step opens or closes, or an answer is chosen
- Per-dialogue player permissions
- ItemsAdder and Nexo publishing, including a “both” option
- Command-based use with Typewriter, Citizens, BetonQuest, BeautyQuests, Quests, and similar plugins
- Player-only visibility, interaction locking, hand hiding, and player-state restoration when playback ends
Requirements
| Requirement | Details |
|---|---|
| Server | Paper 1.21.8–1.21.11+ |
| Java | Java 21 |
| Resource-pack provider | ItemsAdder, Nexo, or both |
| Recommended | PacketEvents 2.13+ |
| Player client | Minecraft Java Edition; must download and accept the rebuilt server resource pack |
ItemsAdder, Nexo, PacketEvents, Typewriter, and other named plugins are separate products and are not included with Dialogue.
PacketEvents is optional, but strongly recommended for production. It provides reliable empty-hand Q input, strict look and movement locking, hidden hands, a standalone camera anchor, and accurate tracking of client-side cinematic cameras.
The Studio is included in Dialogue.jar. You do not need to install a separate website, Node.js, Python, or a database.
Installation and first setup
- Stop the Paper server.
- Place
Dialogue.jarin the server'spluginsdirectory. - Install ItemsAdder or Nexo if the server does not already use one of them.
- Install PacketEvents 2.13+ for the complete playback experience.
- Start the server. Dialogue creates its configuration, a private Studio token, and a sample project.
- Run
/dialogue webas an operator or administrator with the correct permissions. - Open the exact Studio address shown by the command and paste the separately displayed token.
- Review the sample conversation or create your own, then click Save changes and Publish pack.
- Rebuild or reload the chosen resource-pack provider.
- Make sure the player receives the new pack, reconnect, and test
/dialogue blacksmith_intro.
The included blacksmith_intro sample is a project template. It is not playable until Publish pack has been run at least once.
Provider refresh after publishing
- ItemsAdder: Dialogue queues
/iazipautomatically by default, approximately three seconds after publishing. - Nexo: automatic reload is off by default. Run
/nexo reload allwhen the editing session is finished. - Both: ItemsAdder is queued automatically; Nexo still needs its manual reload unless Nexo auto-reload is enabled in the configuration.
After the provider finishes, distribute or reload the rebuilt resource pack and reconnect the test client.
Using Dialogue Studio
1. Write
Enter the speaker and line shown to the player. Choose what Q should do next and add more steps from the left sidebar as the conversation grows. Dialogue IDs are available under Dialogue details and IDs when you need to rename or integrate the conversation.
2. Design
Select a layer above the canvas, then edit that layer's controls. Drag inside the amber outline to move it. Drag an amber corner handle to resize it.
Design edits apply to all steps by default. Turn off Apply design edits to all steps only when the current step intentionally needs a different layout.
The artwork library and pixel-safe resize settings stay collapsed until they are needed, keeping the main inspector focused on the selected layer.
3. Choices
Add the answers available on the current step. Each answer can:
- continue to another step;
- end the conversation; and
- run one or more server commands.
Preview choice boxes can show example answer boxes while arranging the layout. These examples are preview-only and are never published as real choices.
4. Preview
Use Play complete dialogue animation to review the same opening, backdrop, typing, choice, and closing states that will be published.
Use Fit canvas while arranging the design. Switch to 1:1 pixels for the final sharpness check.
5. Publish
Connect Studio to the server, select ItemsAdder, Nexo, or both, confirm the resource namespace, save, and click Publish pack.
Publish again whenever dialogue text, artwork, layout, choices, or animation settings change.
Useful Studio shortcuts
| Shortcut | Action |
|---|---|
Ctrl/Cmd + S |
Save changes |
Ctrl/Cmd + Z |
Undo |
Ctrl/Cmd + Shift + Z or Ctrl/Cmd + Y |
Redo |
Ctrl/Cmd + C / Ctrl/Cmd + V |
Copy / paste the selected layer |
Delete |
Remove a decoration or hide the selected optional layer |
Project import and export are available from the Project menu. Export a copy before a large redesign or server migration.
Player controls
| Input | During playback |
|---|---|
Q |
Reveal the full line, continue, or confirm the selected answer |
W |
Move to the previous answer |
S |
Move to the next answer |
Dialogue temporarily reserves these controls and blocks normal world interaction while a conversation is active. The player's held items, off-hand item, visibility, location, velocity, and camera state are restored when the conversation completes, is stopped, is replaced, or the player disconnects.
Configuration
The server configuration is created at:
plugins/Dialogue/config.ymlThe defaults are suitable for a local Studio and the standard ItemsAdder/Nexo directory layout. After editing this file, run /dialogue reload to apply the changes and restart the Studio listener.
Web Studio settings
| Setting | Default | Purpose |
|---|---|---|
web.enabled |
true |
Enables the built-in Studio service |
web.bind |
127.0.0.1 |
Address the Studio listens on; the default is local-only |
web.port |
8767 |
Studio port; this is separate from the Minecraft server port |
web.advertised-host |
blank | Public hostname or IP shown when using direct-port access |
web.public-url |
blank | Full HTTPS origin used behind nginx, Caddy, or another reverse proxy |
web.token |
generated | Private administrator token; treat it like a password |
web.max-request-bytes |
100663296 |
Maximum request size, 96 MiB by default |
web.max-asset-bytes |
8388608 |
Maximum size of one uploaded PNG, 8 MiB by default |
To rotate the Studio token, set web.token to an empty value and run /dialogue reload. Dialogue generates and saves a new token.
Playback settings
| Setting | Default | Purpose |
|---|---|---|
runtime.display-distance |
0.42 |
Distance between the active camera and the overlay |
runtime.display-scale |
0.55 |
Overall in-game overlay scale |
runtime.frame-ticks |
1 |
Server ticks held for each published animation state |
runtime.lock-interactions |
true |
Blocks world and entity interaction during playback |
runtime.lock-look |
true |
Locks mouse-look during standalone playback |
runtime.hide-player |
true |
Also hides the active player from other online players |
The default projection is calibrated for a 1920 × 1080 Java client at FOV 70. If the intended audience uses a different profile, test changes to distance and scale in game before publishing the server publicly.
Resource-pack paths and reloads
| Setting | Default | Purpose |
|---|---|---|
exports.itemsadder-directory |
../ItemsAdder |
ItemsAdder plugin directory, relative to plugins/Dialogue |
exports.nexo-directory |
../Nexo |
Nexo plugin directory, relative to plugins/Dialogue |
integration.itemsadder-auto-reload |
true |
Queues iazip after an ItemsAdder publication |
integration.nexo-auto-reload |
false |
Queues nexo reload all after a Nexo publication |
integration.reload-debounce-ticks |
60 |
Wait before an automatic provider refresh; 60 ticks is about 3 seconds |
The provider and resource namespace are selected in Studio's Publish step and saved with the project. The shipped configuration still retains exports.provider and exports.namespace, but current publishing uses the Studio project settings instead.
Remote Studio access
The safe default, 127.0.0.1:8767, accepts connections only from the Minecraft host. Choose one of these methods for remote administration:
- SSH tunnel: keep the default configuration and forward port 8767 from your computer.
ssh -L 8767:127.0.0.1:8767 account@minecraft-host Then open http://127.0.0.1:8767 locally.
- HTTPS reverse proxy: keep
web.bind: 127.0.0.1, proxy a dedicated HTTPS hostname to port 8767, and set the external origin.
   web:
     bind: 127.0.0.1
     port: 8767
     public-url: 'https://dialogue.example.com'
web.public-url must be an origin without an added path.
- Direct port: set
web.bind: 0.0.0.0andweb.advertised-hostto the server hostname. Only use this on a restricted firewall or trusted network; the built-in listener does not provide TLS on its own.
Run /dialogue web after configuration. Its health-check address should return Dialogue status, not a hosting-provider or nginx welcome page.
Publishing and resource packs
The Publish pack action creates the current dialogue frames and writes them into the selected provider's pack:
- ItemsAdder:
plugins/ItemsAdder/contents/<namespace>/resourcepack/ - Nexo:
plugins/Nexo/pack/
Publishing does not automatically force every connected player to download a changed pack. Complete the provider's normal pack build and distribution process, then reconnect the test client.
/dialogue publish [provider] is a maintenance command that republishes frames already created by Studio. It does not render unsaved text, artwork, or layout changes. Use Publish pack in Studio for the first publication and after every content change.
Commands
| Command | Description | ||
|---|---|---|---|
/dialogue <id> |
Play a published dialogue as the current player | ||
/dialogue play <id> [player] |
Start a dialogue for a player; console use requires a player name | ||
/dialogue stop [player] |
Close an active dialogue | ||
/dialogue web |
Show Studio status, addresses, warnings, health check, and access token | ||
/dialogue web token |
Show only the current Studio token | ||
/dialogue status |
Show the complete Studio access report | ||
/dialogue web status |
Same access report as /dialogue status |
||
| `/dialogue publish [itemsadder\ | nexo\ | both]` | Republish the frames already rendered by Studio |
/dialogue reload |
Reload configuration, project data, published frames, and the Studio listener |
Command aliases: /dialogues and /dlg.
Permissions
| Permission | Default | Purpose |
|---|---|---|
dialogue.use |
Everyone | Use /dialogue <id> for a public dialogue |
dialogue.admin |
Operators | Shows the administrative command help and suggestions |
dialogue.web |
Operators | View Studio connection details and token |
dialogue.publish |
Operators | Republish existing rendered frames |
dialogue.reload |
Operators | Reload Dialogue configuration and data |
dialogue.play.others |
Operators | Start or stop a dialogue for another player |
dialogue.admin is not a replacement for the more specific permissions. When creating a non-operator staff role, grant dialogue.admin plus each administrative action that role should be allowed to use.
Each dialogue can also have its own player permission. Set it in Studio's Publish step; leave it blank when everyone may play that conversation.
Integrations
Typewriter
Add a Cinematic Player Command containing:
dialogue <id>Do not add a player name when Typewriter runs it as the player.
Do not overlap the same frame range with Typewriter's Spoken Dialogue, Action Bar Dialogue, or Subtitle Dialogue cinematic entries. Those entries create a second dialogue surface and use Minecraft's XP strip as a progress indicator.
Typewriter remains in control of its camera. Dialogue follows the selected camera without mounting, replacing, or resetting it.
Citizens, quest plugins, and scripted systems
Use the player form when the integration can run a command as the player:
dialogue <id>Use the console form when the integration supplies a player placeholder:
dialogue play <id> <player>This works with Citizens command traits and the command actions in common quest plugins, including BetonQuest, BeautyQuests, and Quests.
Commands during a conversation
Studio can run console commands at these points:
- conversation start;
- step enter;
- step exit;
- answer selection; and
- conversation end.
Available placeholders are {player}, {uuid}, {dialogue}, {node}, and {choice}. Save commands without a leading /.
Updating Dialogue
- Back up
plugins/Dialogueand the relevant ItemsAdder/Nexo pack directory. - Stop the server and replace the old
Dialogue.jar. - Start the server and check the console for configuration warnings.
- Open Studio and click Publish pack once.
- Rebuild or reload ItemsAdder/Nexo, distribute the rebuilt pack, and reconnect.
- Test a short dialogue before reopening the server to players.
Updating to 1.2.3
Version 1.2.3 makes generated dialogue models full-bright so world lighting no longer darkens the PNG artwork. Existing projects must be published once after installing the new JAR, followed by a provider pack rebuild and a fresh client download. Dialogue does not color-correct or re-encode the original PNG files.
When updating from 1.1, the republish is mandatory because current model keys are stored under <resource-namespace>:dialogues/*. An old 1.1 pack cannot find those keys.
Backups
Back up these locations before updates, migrations, or large project changes:
plugins/Dialogue/config.ymlplugins/Dialogue/data/plugins/Dialogue/web/assets/custom/- the generated Dialogue files in the selected ItemsAdder or Nexo pack
Studio's Project → Export option is also useful for keeping a portable copy of the conversation project.
Troubleshooting
| Problem | What to check |
|---|---|
| The sample says unpublished | Connect Studio and run Publish pack at least once, then rebuild the provider pack. |
| Artwork still looks dark | Confirm the server is running 1.2.3, republish in Studio, rebuild the provider pack, and make the client download the new pack. |
| Dialogue is invisible or shows a missing model | Republish, rebuild ItemsAdder/Nexo, and reconnect with the latest pack. Old 1.1 packs do not contain current model keys. |
| Studio says “Preview only” | Open the exact host and port shown by /dialogue web, choose Connect server, and paste the current token. |
| The browser shows an nginx welcome page | The hostname reaches nginx, but nginx is not proxying to Dialogue's configured bind address and port. |
| W/S or Q is unreliable | Install or update PacketEvents and make sure another dialogue system is not consuming the same controls. |
| An XP strip appears with Typewriter | Remove overlapping Spoken, Action Bar, or Subtitle Dialogue entries and launch Dialogue only through Cinematic Player Command for that frame range. |
| Overlay coverage differs between players | Check resolution, aspect ratio, FOV, view bobbing, and accessibility effects. The default is calibrated for 1920 × 1080 at FOV 70. |
| A custom asset cannot be deleted | Replace or remove every project layer that still uses the asset, save, then delete it from the artwork library. |
| A player remains locked | Try /dialogue stop <player>, confirm the current JAR was installed with a full restart, and inspect the server log if the issue can be reproduced. |
Compatibility and limits
- The overlay is calibrated for a known client profile; Minecraft does not report each player's viewport size to the server.
- One publication can contain up to 5,000 rendered frame states.
- Dialogue handles visual conversation presentation and branching. Use a quest or scripting plugin for objectives, conditions, localization workflows, rewards, and other game systems.
- Confirm that you have redistribution and commercial-use rights for all bundled or uploaded artwork and fonts used by your server.
The Studio includes a searchable handbook from its Help button. For server access help, see the remote web access guide. Release changes are listed in the changelog.
 Folia
Folia Paper
Paper Purpur
 Velocity
Reviews
There are no reviews yet.